Postman-API-Test-Starter
An introductory QuickStart project document on API automation testing with Postman.
Introduction
Introduction to API Testing
What is API?
API, which stands for Application Programming Interface, is a computing interface that defines the interactions between multiple software intermediaries. It specifies the types of calls or requests that can be made, how they are made, the data format to be used, and the conventions to be followed. APIs can also provide extension mechanisms, allowing users to extend existing functionalities in various ways. An API can be custom-made for a specific component or designed based on industry standards to ensure interoperability. By hiding information, APIs enable modular programming, allowing users to work independently using interfaces.
What is API Testing?
API testing is a type of software testing that includes two types: specifically testing the functionality of Application Programming Interfaces (referred to as API) and, more broadly, testing the overall functionality, reliability, security, and performance in integration testing by invoking APIs.
API Best Practice:
- API definition follows the RESTful API style, with semantic URI definitions, accurate HTTP status codes, and the ability to understand the relationships between resources through API definitions.
- Detailed and accurate API documentation (such as Swagger documentation).
- External APIs may include version numbers for quick iteration (e.g., https://thoughtworks.com/v1/users/).
Testing in different quadrants of the testing pyramid has different purposes and strategies. API testing mainly resides in the second and fourth quadrants.
API testing holds a relatively high position in the testing pyramid, focusing on testing functionality and business logic at the boundaries of systems and services. It is executed after the service is built and deployed in the testing environment for validation.
Types of API Testing
Functional Testing
- Correctness Testing
- Exception Handling
- Internal Logic
- ...
Non-functional Testing
- Performance
- Security
- ...
Steps in API Testing
- Send Request
- Get Response
- Verify Response Result
Introduction to Postman and Newman
Postman is a popular API development tool that provides an easy-to-use graphical interface for creating, testing, and debugging APIs. Postman also features the ability to easily write and share test scripts. It supports various HTTP request methods, including GET, POST, PUT, DELETE, etc., and can use various authentication and authorization methods for API testing.
Newman is the command-line tool for Postman, used to run test suites without using the Postman GUI. With Newman, users can easily export Postman collections as an executable file and run them in any environment. Additionally, Newman supports generating test reports in HTML or Junit format and integrating into CI/CD pipelines for automated testing.
In summary, Postman is a powerful API development and testing tool, while Newman is a convenient command-line tool for running test suites without using the Postman GUI. Their combination enhances the efficiency and accuracy of API testing and development.
In addition to basic functionalities, Postman has the following features:
- Environment and Variable Management: Postman supports switching between different environments, such as development, testing, and production, and variable management, making it easy to set variables for different test cases and requests.
- Automated Testing: Users can create and run automated tests using Postman, integrating them into continuous integration or deployment processes for more accurate and efficient testing.
- Collaboration and Sharing: Postman supports sharing collections and environments with teams, facilitating collaboration among team members.
- Monitoring: Postman provides API monitoring, allowing real-time monitoring of API availability and performance.
Meanwhile, Newman has the following characteristics:
- Command-Line Interface: Newman can run in the command line, making it convenient for automated testing and integration into CI/CD processes.
- Support for Multiple Output Formats: Newman supports multiple output formats, including HTML, JSON, and JUnit formats, making it easy to use in different scenarios.
- Concurrent Execution: Newman supports concurrent test execution, improving testing efficiency.
- Lightweight: Compared to the Postman GUI, Newman is a lightweight tool, requiring fewer resources during test execution.
In conclusion, Postman and Newman are essential tools for modern API testing, offering powerful features for efficient, accurate, and automated API testing and development.
In addition to the mentioned features and characteristics, Postman and Newman have other important functionalities and advantages:
- Integration: Postman and Newman can integrate with many other tools and services, such as GitHub, Jenkins, Slack, etc., making it easy to integrate into development and deployment processes for more efficient API development and testing.
- Documentation Generation: Postman can generate API documentation using requests and responses, ensuring accurate and timely documentation.
- Test Scripts: Postman can use JavaScript to write test scripts, providing flexibility and customization in testing. Users can easily write custom test scripts to ensure the expected behavior of the API.
- History: Postman can store the history of API requests, making it convenient for users to view and manage previous requests and responses. This is useful for debugging and issue troubleshooting.
- Multi-Platform Support: Postman and Newman can run on multiple platforms, including Windows, MacOS, and Linux.
In summary, Postman and Newman are powerful tools for modern API testing and development, offering rich features and flexible test scripts to help developers and testers build and test APIs faster and more accurately.
Project Dependencies
The following environments need to be installed in advance
- [x] Node.js, with the demo version being v21.1.0
- [x] Postman installed, you can download the installation package from the official website and complete the installation
Project Structure
The following is the file structure of an API automation testing project for Postman and Newman, which contains test configuration files, test case files, test tool files, and test report files. It can be used for reference.
Postman-Newman-demo
├── README.md
├── package.json
├── package-lock.json
├── Data // Test data folder
│   └── testdata.csv // Test data file
├── Testcase // Test case folder
│   └── APITestDemo.postman_collection.json // Test case file
├── Env // Test environment folder
│   └── DemoEnv.postman_environment.json // Test environment file
├── Report // Test report folder
│   └── report.html
├── .gitignore
└── node_modules // Project dependencies
    └── ...
Building a Postman API Automation Test Project from 0 to 1
Below, we will introduce how to build a Postman and Newman API automation test project from scratch, including test configuration, test cases, test environment, testing tools, and test reports.
You can refer to the demo project: Postman-Newman-demo
Create a New Project Folder
mkdir Postman-Newman-demo
Project initialization
// enter the project folder
cd Postman-Newman-demo
// nodejs project initialization
npm init -y
Install dependencies
Currently, the latest version of newman has some package compatibility issues reported by the html test, so we're using version 5.1.2 here.
// Install newman library
npm install newman@5.1.2--save-dev
Writing API Test Cases in Postman
Creating a Collection and Request in Postman
- Open Postman, click the New button in the top left corner, select Collection, enter the name of the collection, click the Create Collection button to create a collection named "demo."
- In the collection, click the three dots in the top right corner, select Add Request, enter the name of the request, and click the Save button to create a request named "get-demo." Add another request named "post-demo."
Editing Request and Writing Test Cases
Refer to the interface documentation in the demoAPI.md file in the project folder to obtain information such as the URL, request method, request headers, and request body used by the "demo" requests.
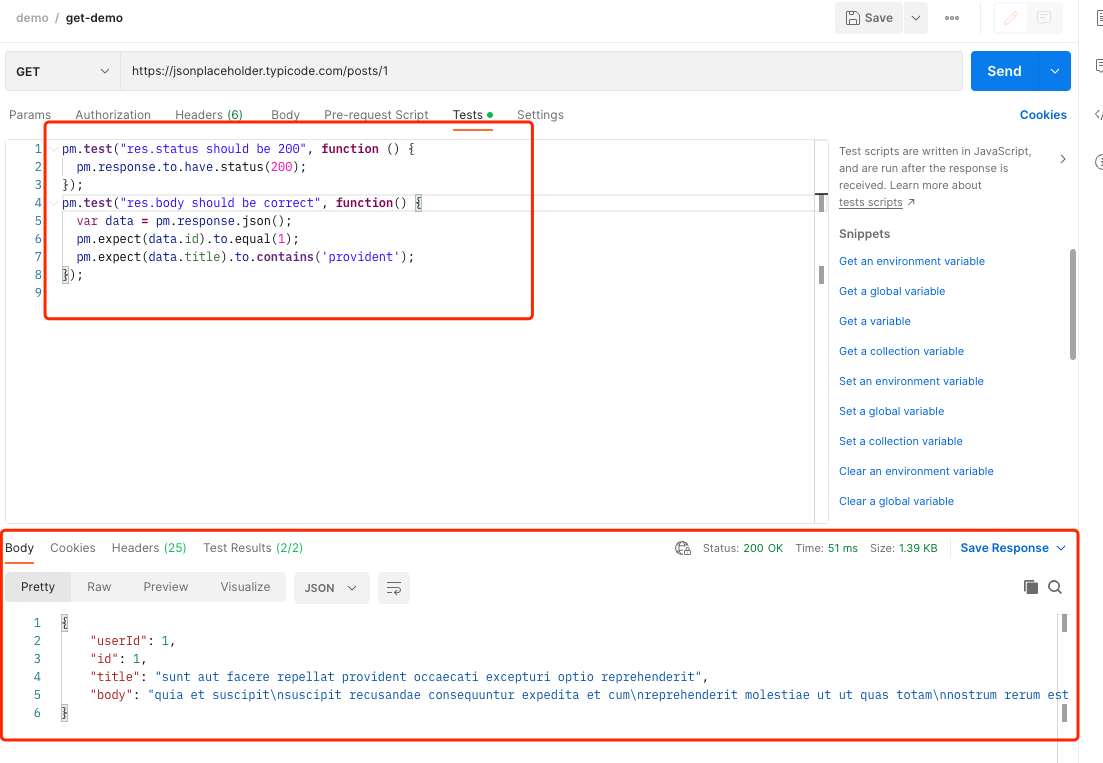
get-demo
- In the "get-demo" request, select the GET request method and enter the URL as https://jsonplaceholder.typicode.com/posts/1.
- In the Headers section, add a header with Key as "Content-Type" and Value as "application/json."
- Under Tests, add the following script to verify the response result:
pm.test("res.status should be 200", function () {
  pm.response.to.have.status(200);
});
pm.test("res.body should be correct", function() {
  var data = pm.response.json();
  pm.expect(data.id).to.equal(1);
  pm.expect(data.title).to.contains('provident');
});
- Click the Send button to send the request and verify the response result.
Confirm that the response result is correct, click the Save button to save the request.
post-demo
- In the Request of the post-demo, select the POST request method and enter the URL as https://jsonplaceholder.typicode.com/posts.
- In Headers, add a request header with Key as Content-Type and Value as application/json.
- In Body, select raw, select JSON format, and enter the following request body:
{
    "title": "foo",
    "body": "bar",
    "userId": 1
}
- Under Tests, add the following script to verify the response result:
pm.test("res.status should be 201", function () {
  pm.response.to.have.status(201);
});
pm.test("res.body should be correct", function() {
  var data = pm.response.json();
  pm.expect(data.id).to.equal(101);
  pm.expect(data.title).to.equal('foo');
});

Confirm that the response result is correct, click the Save button to save the request.
Configuring Test Environment in Postman
The following steps involve using the host of the API requests as environment variables for demonstration purposes.
Adding Environment Variables
- In the top right corner of Postman, click the gear icon, select Manage Environments, click the Add button, enter the environment name as "DemoEnv," and click the Add button to create an environment named "DemoEnv."
- Edit the environment variables, add a key named "host" with a value of https://jsonplaceholder.typicode.com.
- Click the Add button to save the environment variables.
Updating Requests
- In the "get-demo" request, update the URL to {{host}}/posts/1.
- In the "post-demo" request, update the URL to {{host}}/posts.
Verifying Environment Variables
- In the top right corner of Postman, click the gear icon, select DemoEnv to switch to the "DemoEnv" environment.
- Select the "get-demo" request, click the Send button to send the request, and verify the response result. After confirming the correctness of the response, click the Save button to save the request.
- Select the "post-demo" request, click the Send button to send the request, and verify the response result. After confirming the correctness of the response, click the Save button to save the request.
Exporting Environment Variables and Test Case Files
- In the top right corner of Postman, click the gear icon, select Export, choose DemoEnv, and click the Export button to export the environment variables.
- Select the demo Collection containing the "get-demo" and "post-demo" requests, click the three dots in the top right corner, select Export, choose Collection v2.1, and click the Export button to export the test case file.
Adjusting Project File Structure
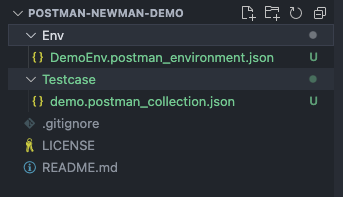
Creating Env and Testcase Folders
- In the project folder, create a folder named Env to store environment variable files.
// Create Env folder
mkdir Env
- In the project folder, create a folder named Testcase to store test case files.
// Create Testcase folder
mkdir Testcase
Organizing Case and Environment Files
Place the exported environment variable files and test case files into the Env and Testcase folders within the project folder.
Adjusting the package.json file
- In the package.json file, add the following script to run the test cases:
"scripts": {
    "test": "newman run Testcase/demo.postman_collection.json -e Env/DemoEnv.postman_environment.json"
}
Running Test Cases
npm run test
Advanced Usage
This section will cover some advanced usages of Postman and Newman, including testing data, testing scripts, testing reports, and report integration. It will also explain how to integrate Postman and Newman into the CI/CD process for automated testing.
Generating HTML Test Reports
Using the newman-reporter-htmlextra as an example, the demo will illustrate how to generate HTML test reports.
Installing the newman-reporter-htmlextra Dependency
npm install newman-reporter-htmlextra --save-dev
Note: Currently, there are compatibility issues with some packages in the latest version (V6) of Newman regarding HTML test reports. Therefore, version 5.1.2 is used here.
Adjusting package.json
In the package.json file, update the test script to run test cases and generate HTML test reports:
"test": "newman run Testcase/demo.postman_collection.json -e Env/DemoEnv.postman_environment.json -r htmlextra --reporter-htmlextra-export ./Report/Postman-newman-demo-api-testing-report.html"
Specify the path for the HTML test report output as Report/Postman-newman-demo-api-testing-report.html
Run Test Cases to Generate HTML Report
- Run the test cases
npm run test
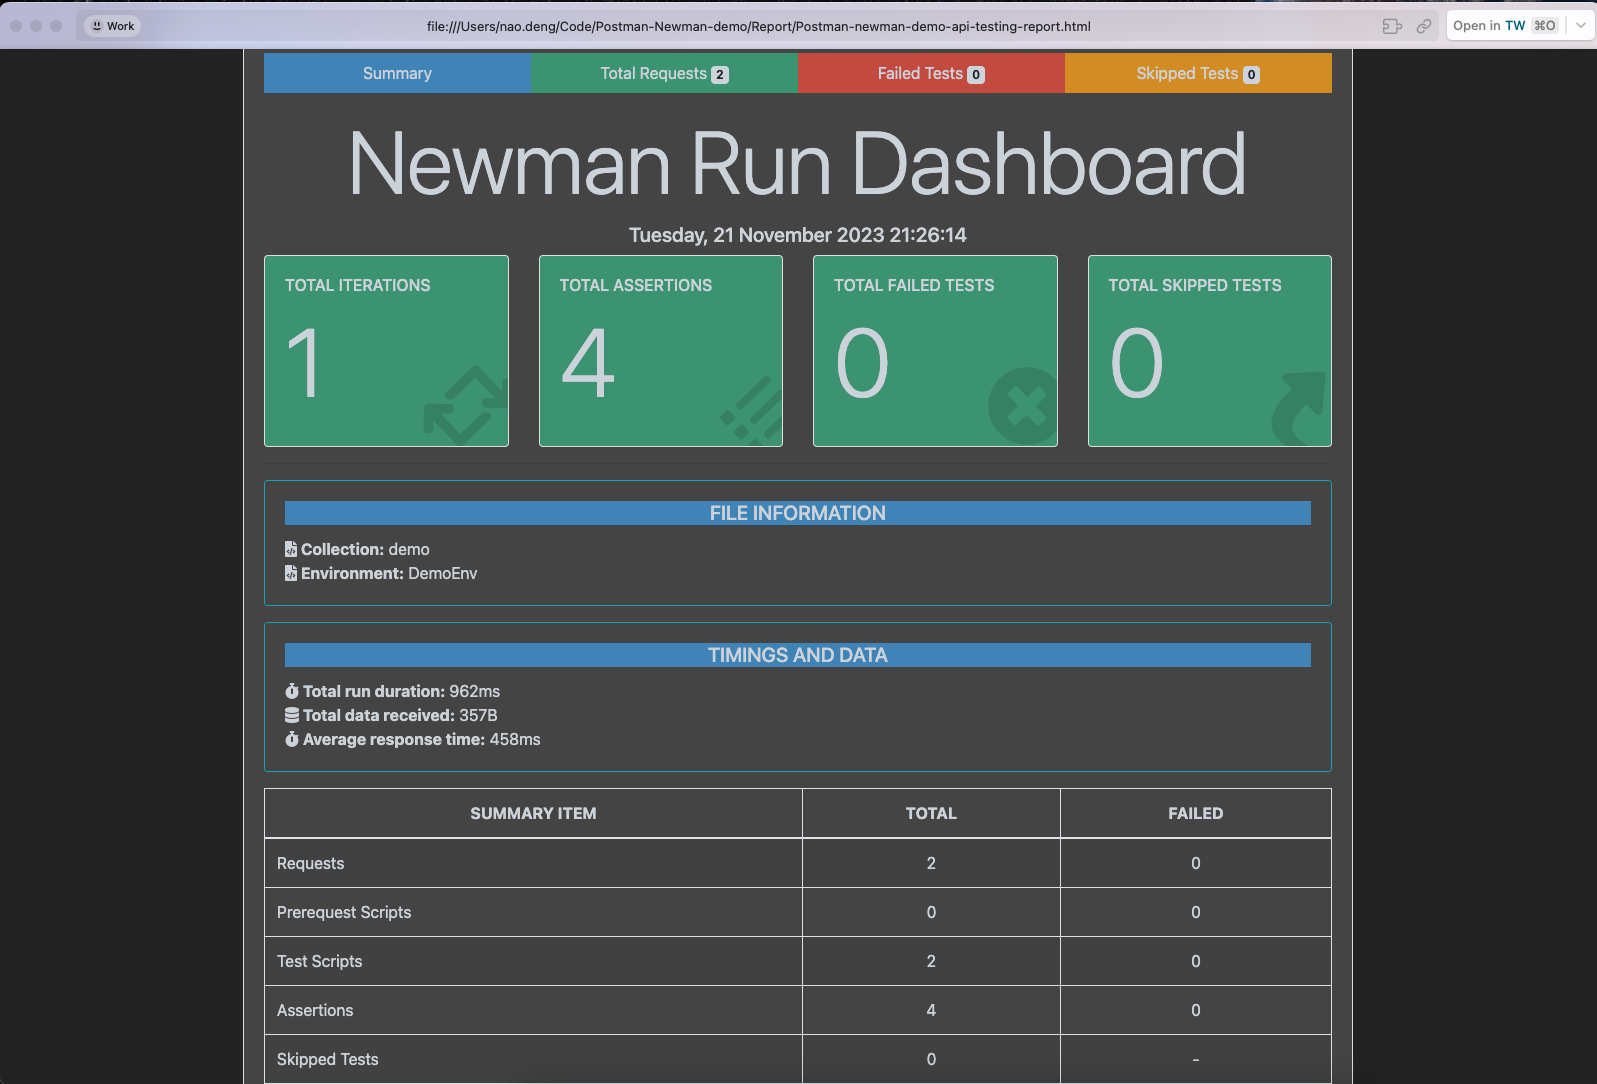
- Check the Report folder, you will find that a Postman-newman-demo-api-testing-report.html file has been generated.
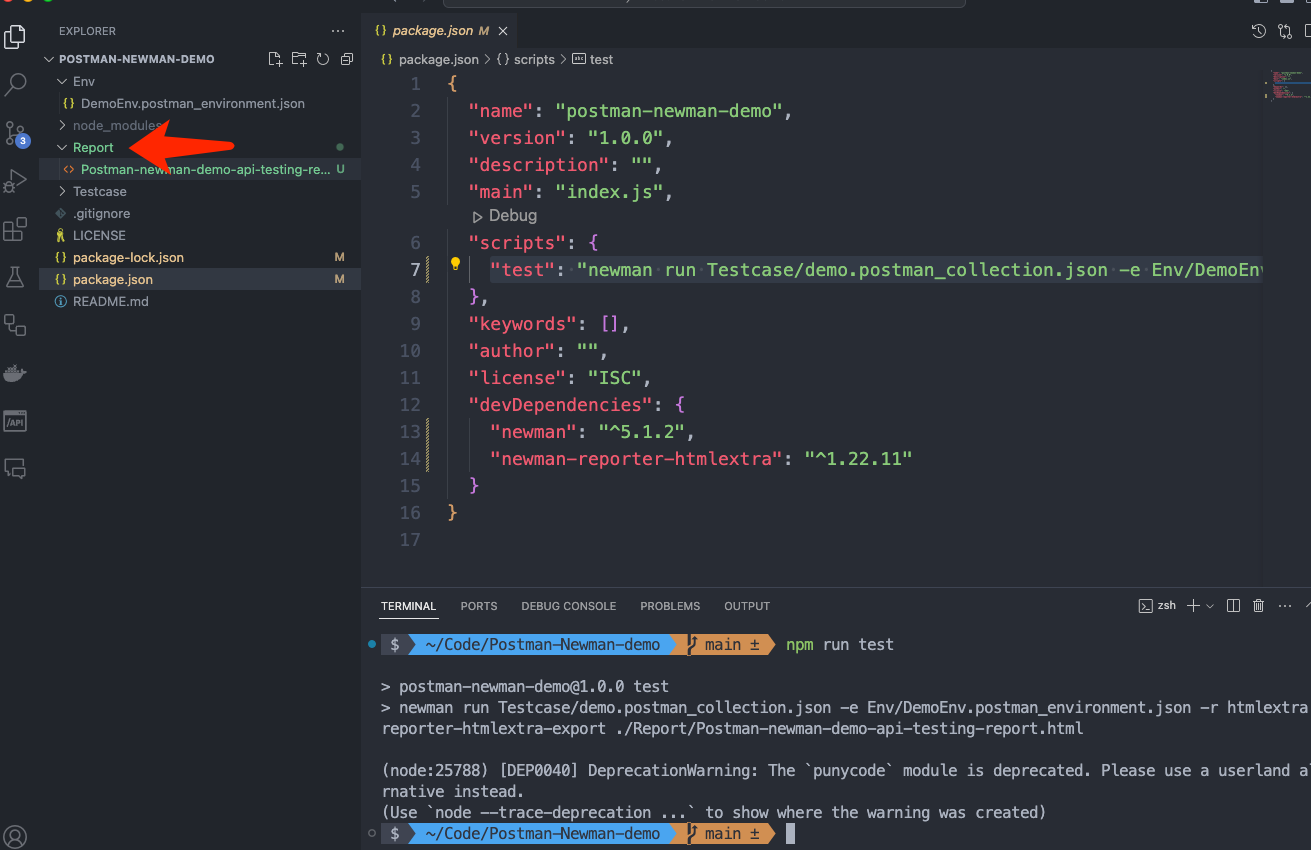
- Open the Postman-newman-demo-api-testing-report.html file in a browser to view the HTML test report.
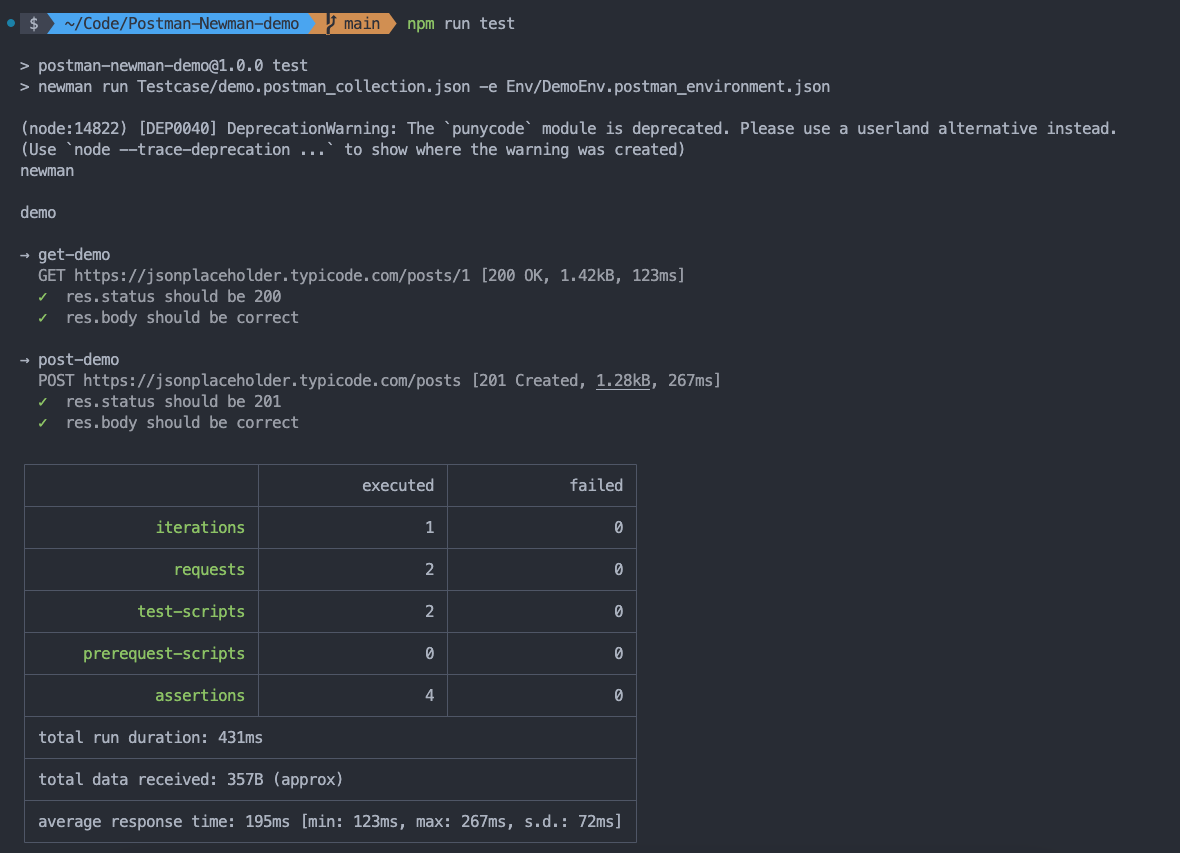
Generating Reports in Multiple Formats
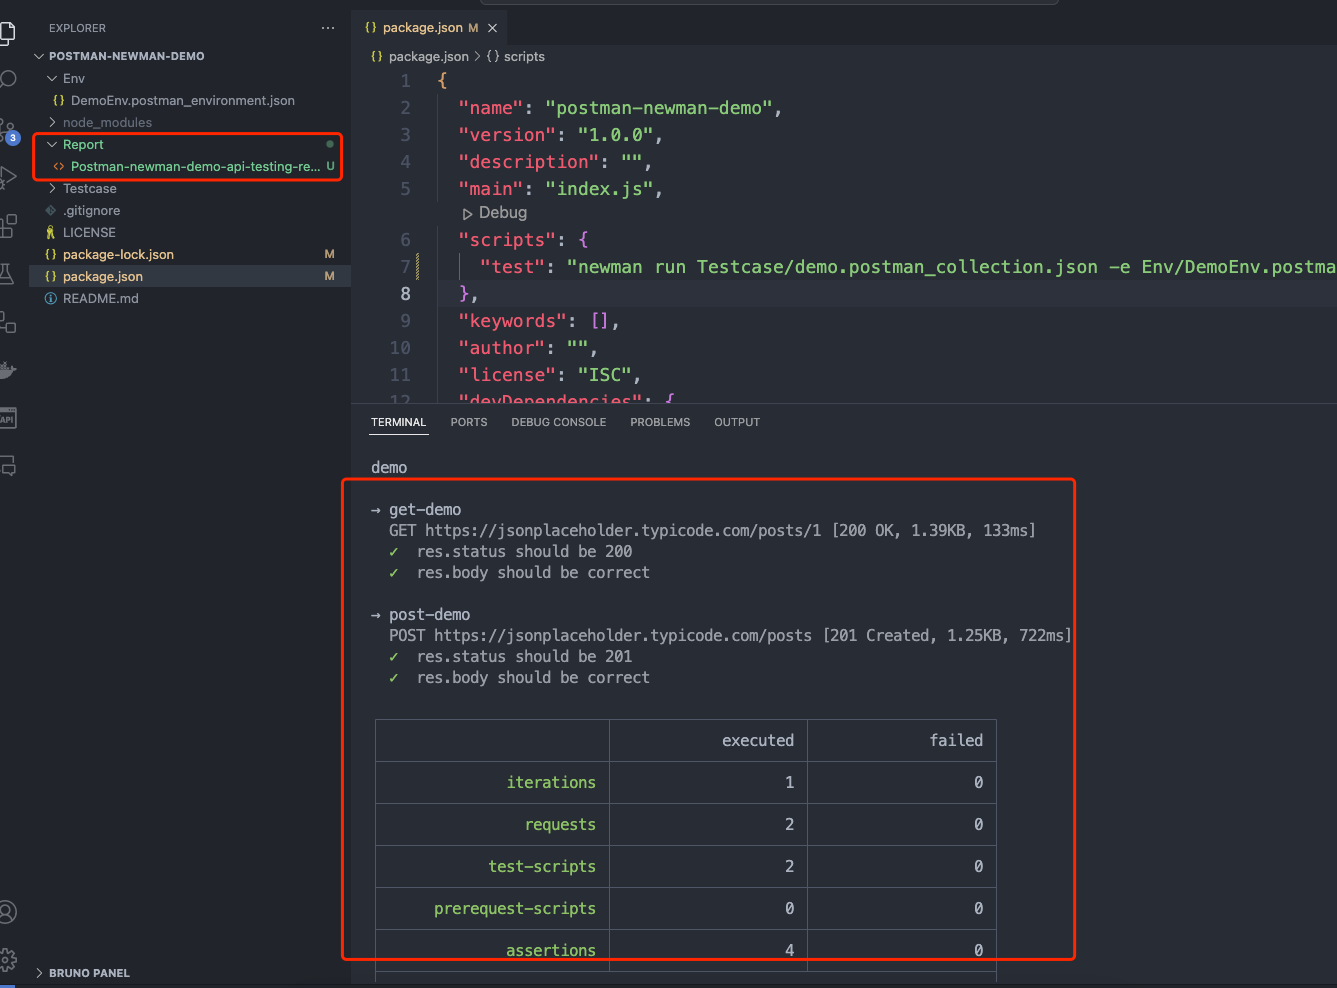
The previous configuration is for generating HTML-format test reports. If you want to output reports in multiple formats, such as the command line (CLI) report, add the following script to the package.json file:
"test": "newman run Testcase/demo.postman_collection.json -e Env/DemoEnv.postman_environment.json -r cli,htmlextra --reporter-htmlextra-export ./Report/Postman-newman-demo-api-testing-report.html"
Run the test cases again, and you will find both HTML and CLI format test reports in the Report folder.
Continuous Integration (CI) with CI/CD
Integrating API automation test code into the CI/CD process enables automated testing, improving testing efficiency.
Integrating with GitHub Actions
Taking GitHub Actions as an example, similar steps can be followed for other CI tools.
Refer to the demo: Postman-Newman-demo
Create the .github/workflows directory: In your GitHub repository, create a directory named .github/workflows. This will be the place to store GitHub Actions workflow files.
Create the workflow file: In the .github/workflows directory, create a YAML-formatted workflow file, for example, postman.yml.
Edit the postman.yml file: Copy and paste the following content into the file:
name: RUN Postman API Test CI

on:
  push:
    branches: [ "main" ]
  pull_request:
    branches: [ "main" ]

jobs:
  RUN-Postman-API-Test:

    runs-on: ubuntu-latest

    strategy:
      matrix:
        node-version: [ 18.x]
        # See supported Node.js release schedule at https://nodejs.org/en/about/releases/

    steps:
      - uses: actions/checkout@v3
      - name: Use Node.js ${{ matrix.node-version }}
        uses: actions/setup-node@v3
        with:
          node-version: ${{ matrix.node-version }}
          cache: 'npm'

      - name: Installation of related packages
        run: npm ci

      - name: RUN SuperTest API Testing
        run: npm test

      - name: Archive Postman test report
        uses: actions/upload-artifact@v3
        with:
          name: Postman-test-report
          path: Report

      - name: Upload Postman report to GitHub
        uses: actions/upload-artifact@v3
        with:
          name: Postman-test-report
          path: Report
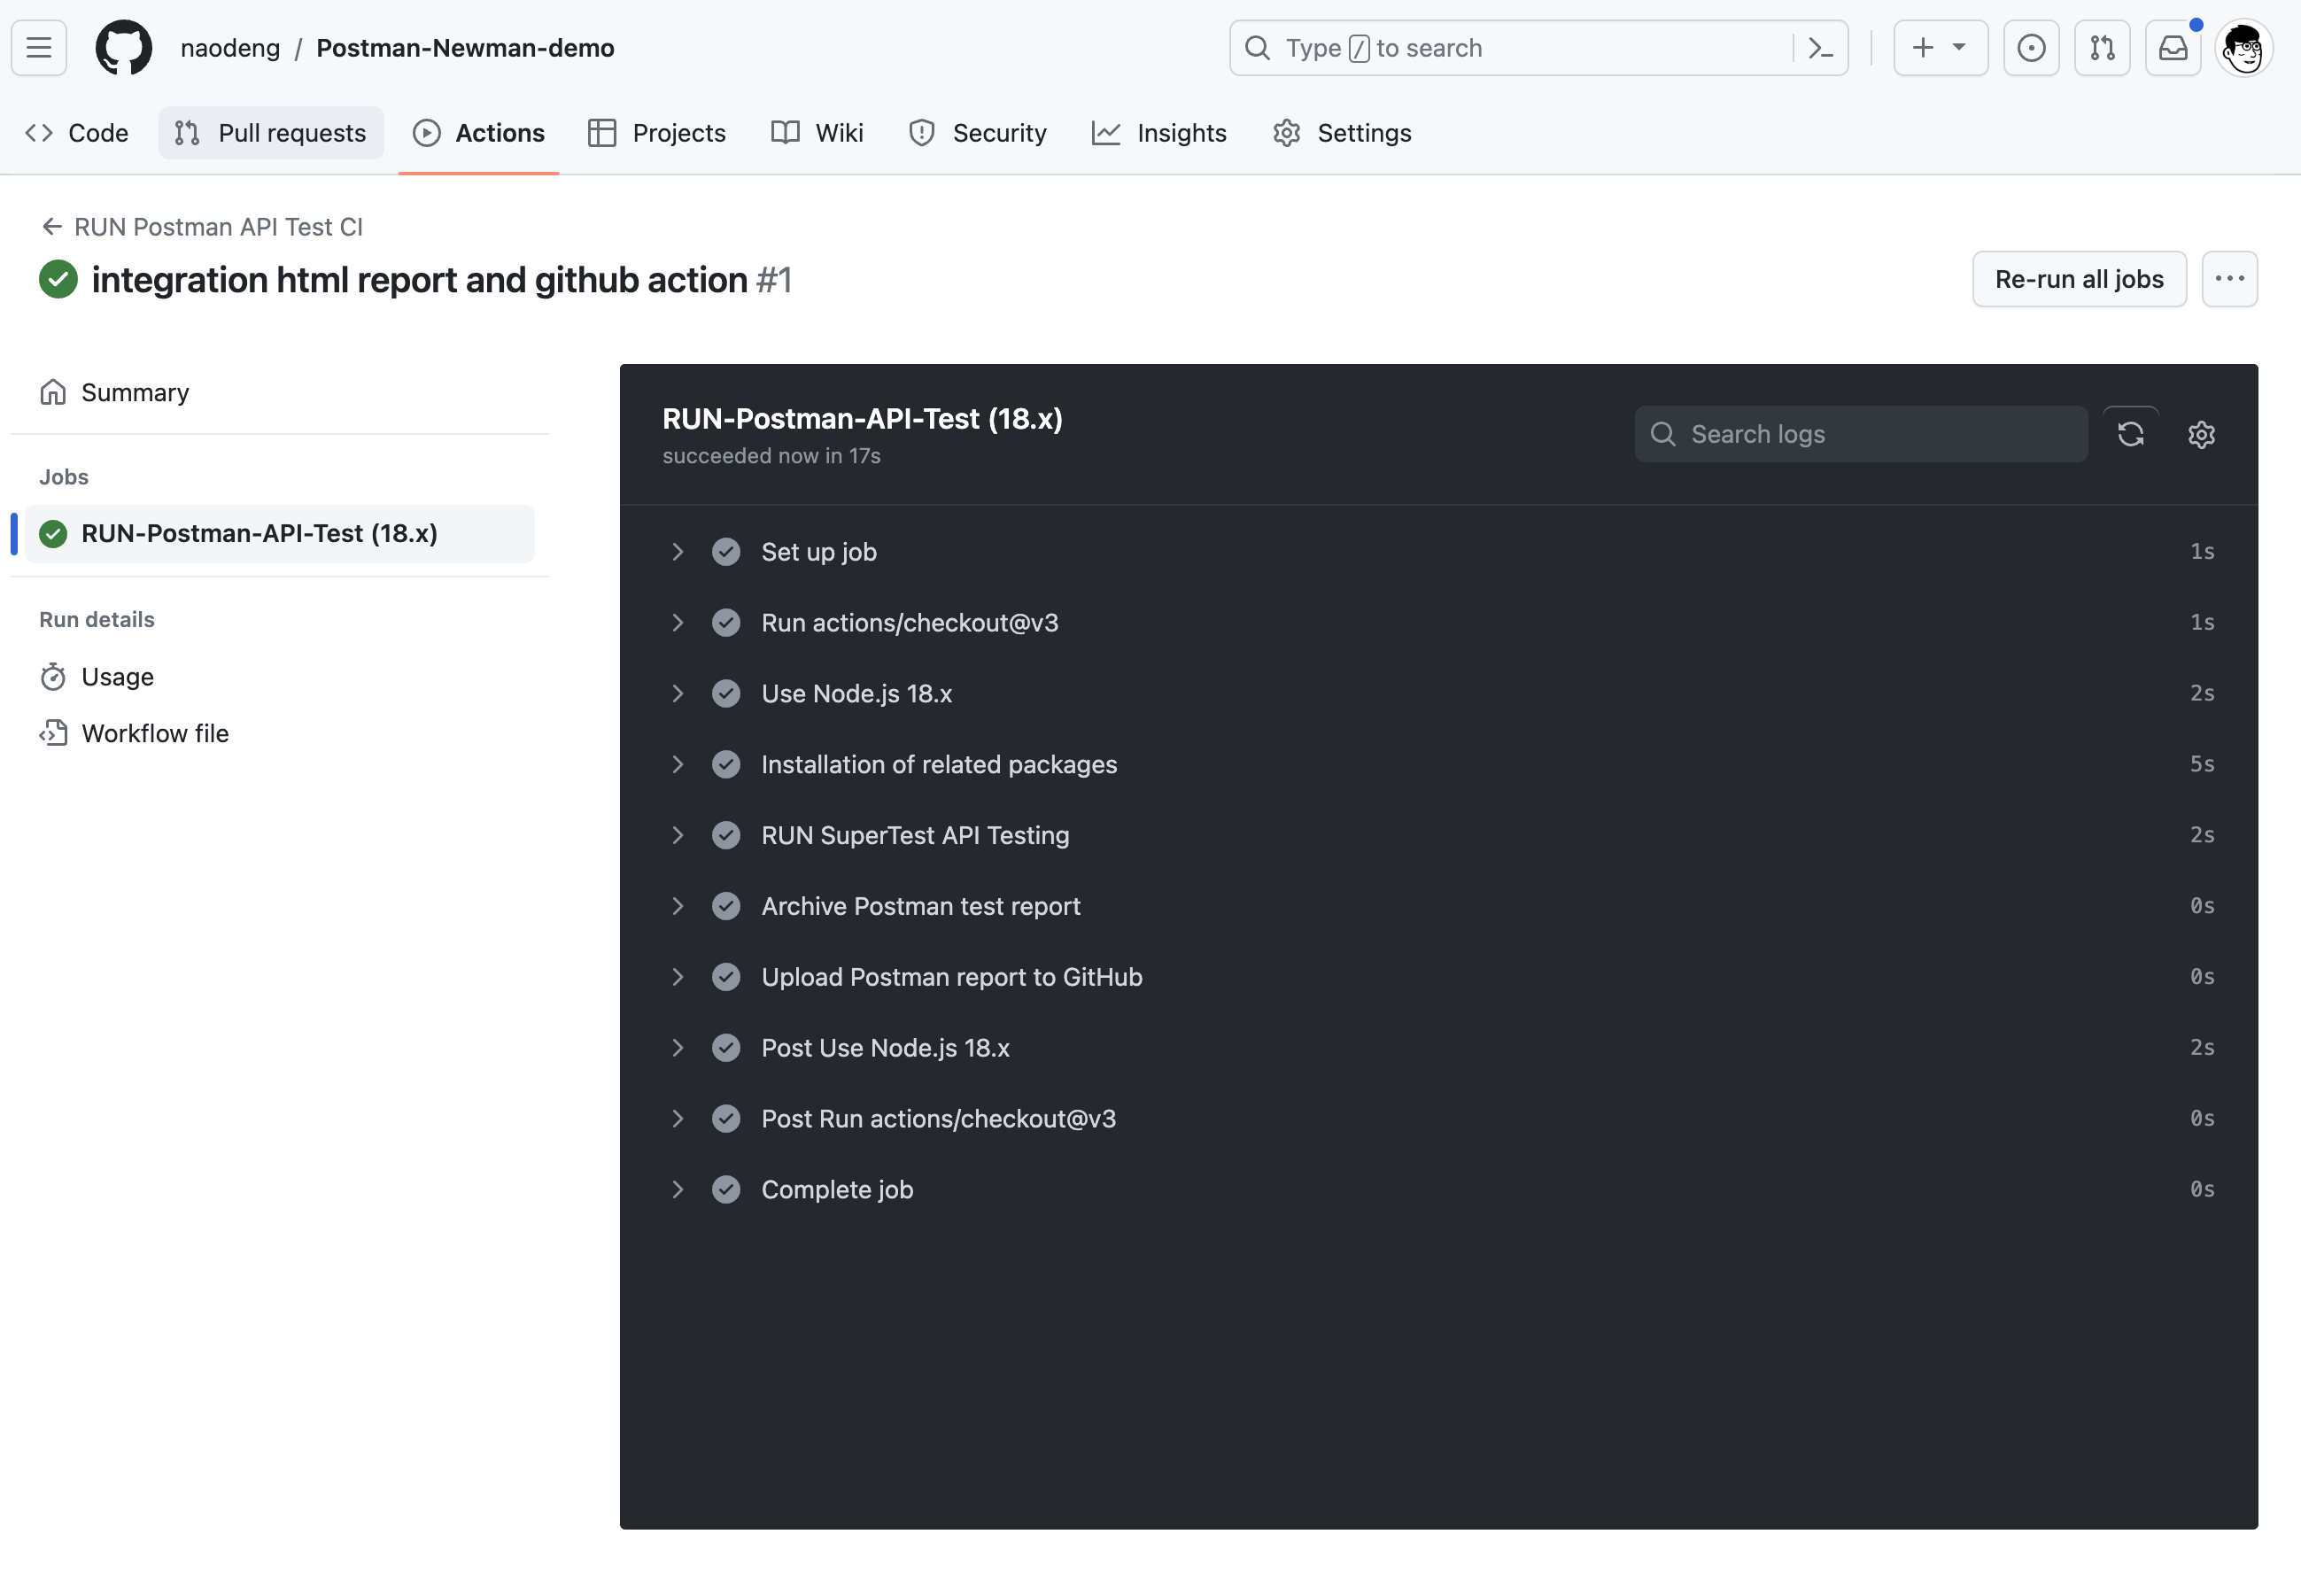
- Commit your code: Add the postman.yml file to the repository and commit the changes.
- View the test report: In GitHub, navigate to your repository. Click on the Actions tab at the top and then click on the RUN-Postman-API-Test workflow on the left. You should see the workflow running, and once it completes, you can view the results.
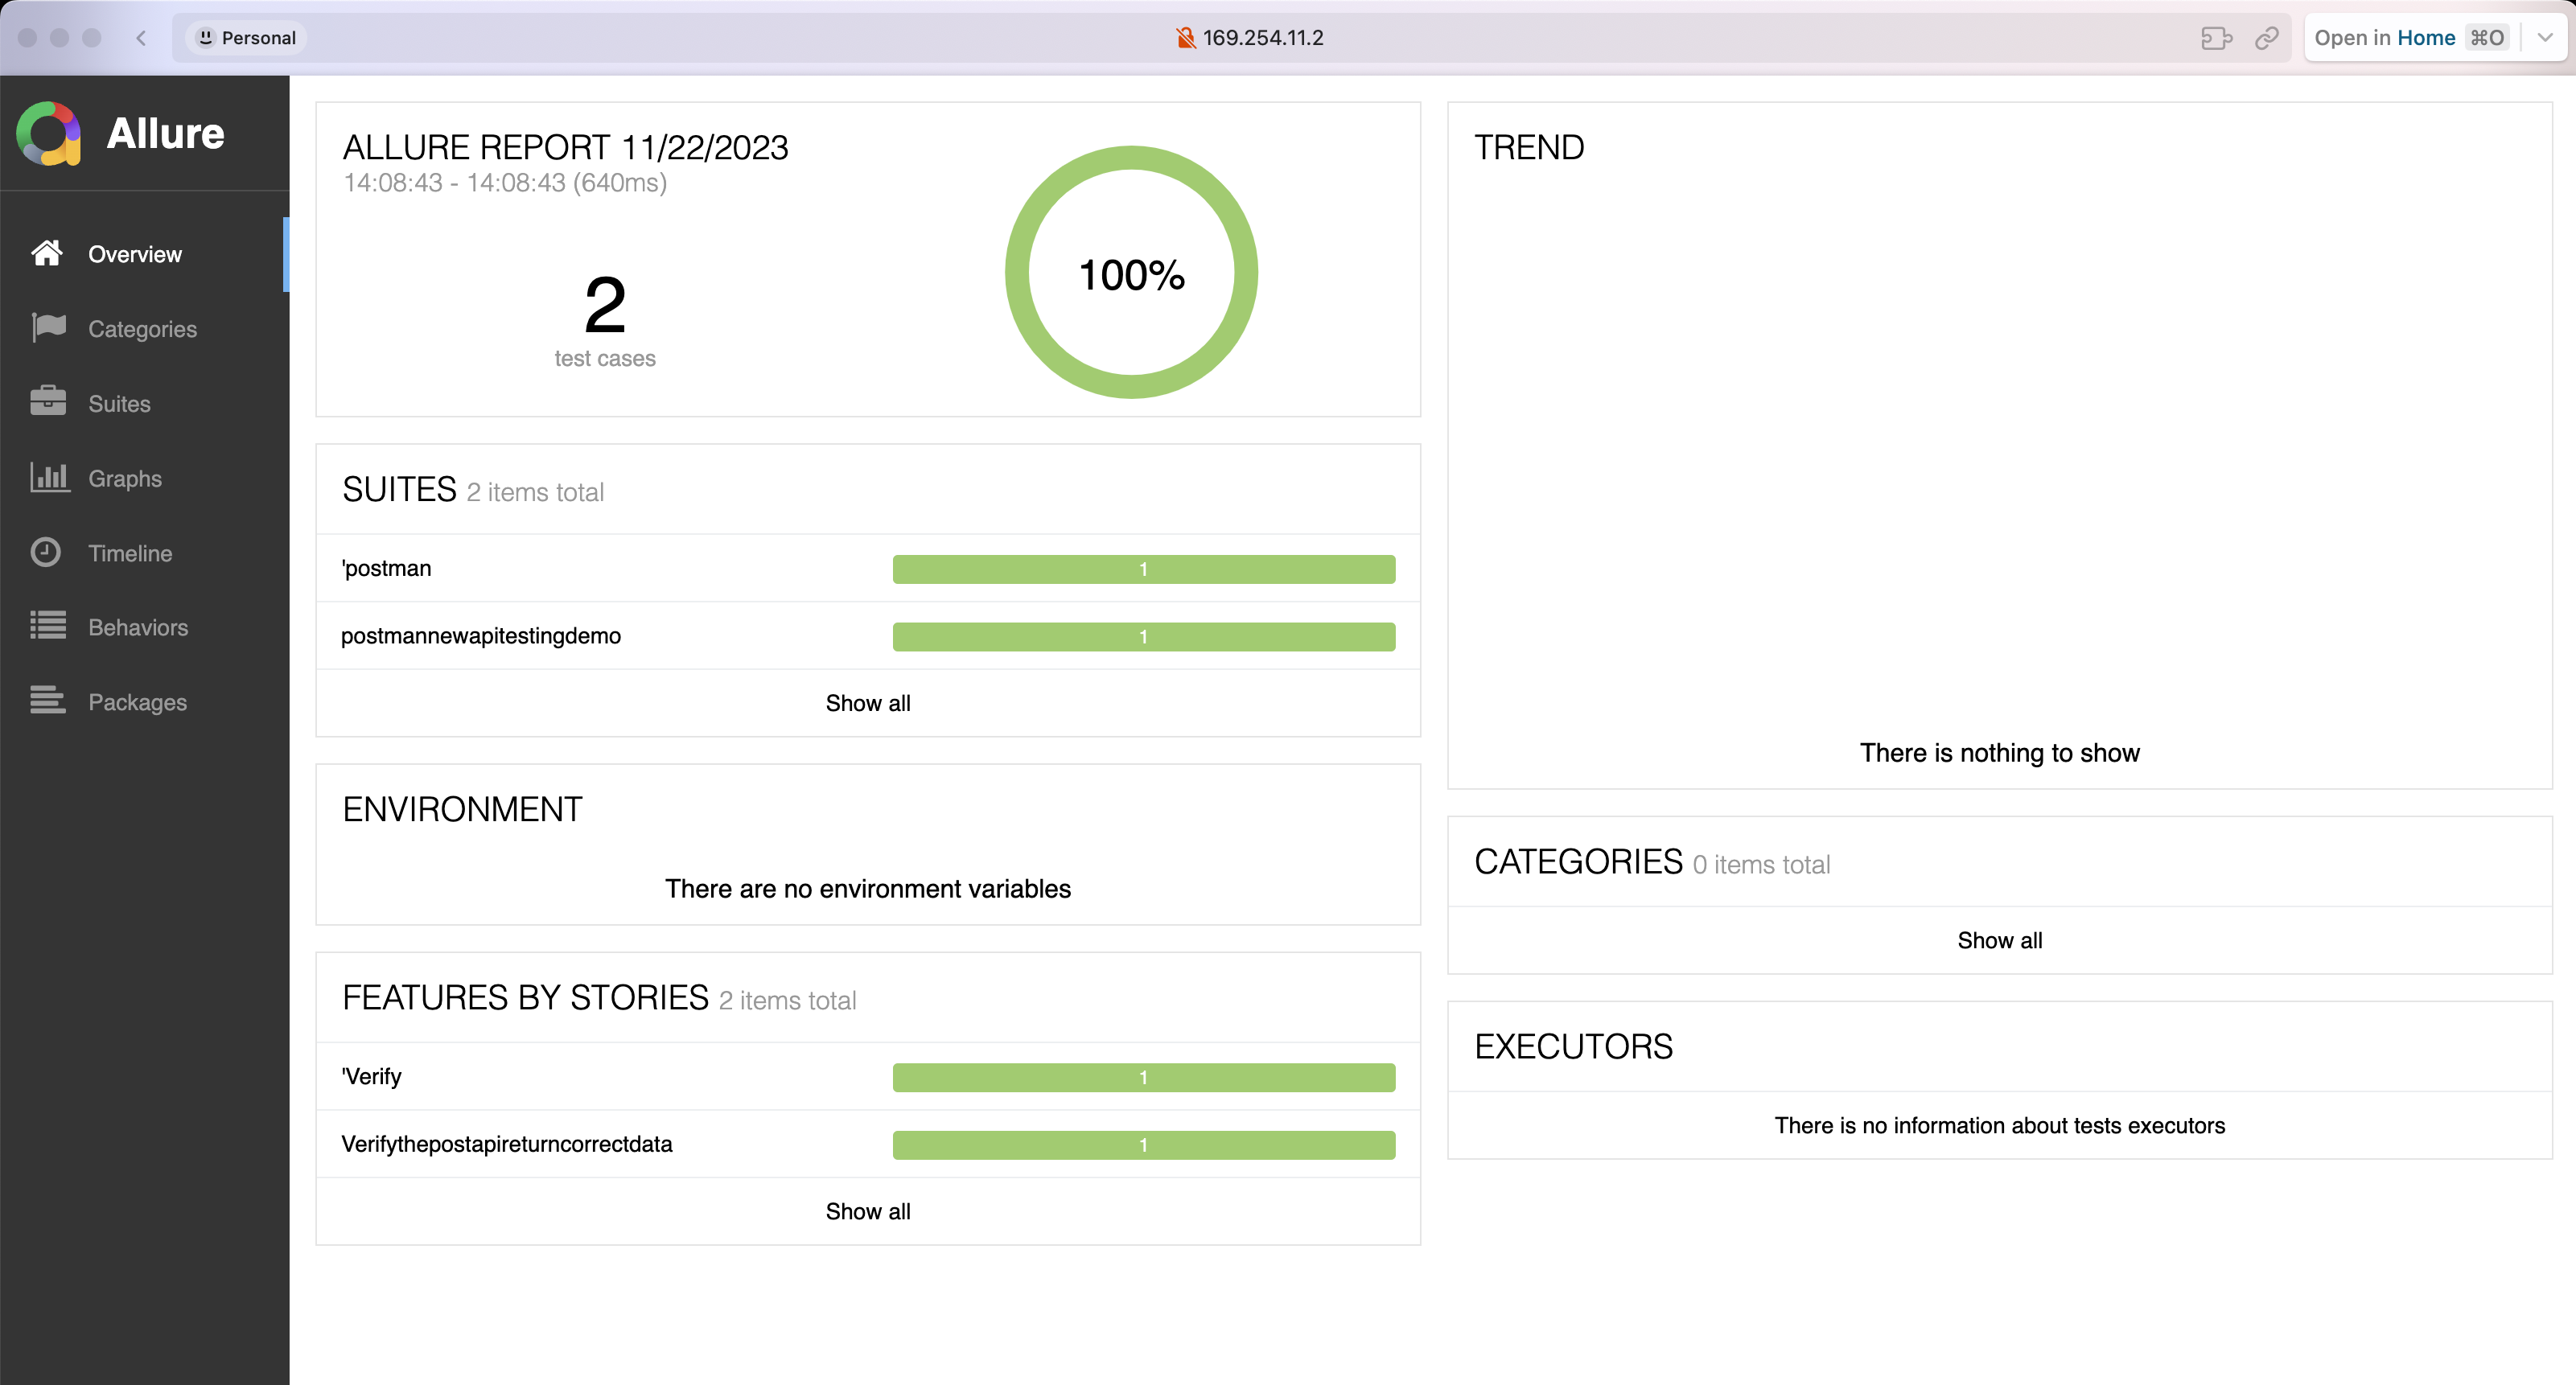
Integrating Allure Test Report
Allure is a lightweight, flexible, and multi-language-supported test reporting tool that can generate various types of test reports, including pie charts, bar charts, line charts, etc., making it easy to visualize test results.
Installing Allure Test Report Dependencies
npm install newman-reporter-allure --save-dev
Adjusting the Script in package.json for Generating Allure Test Reports
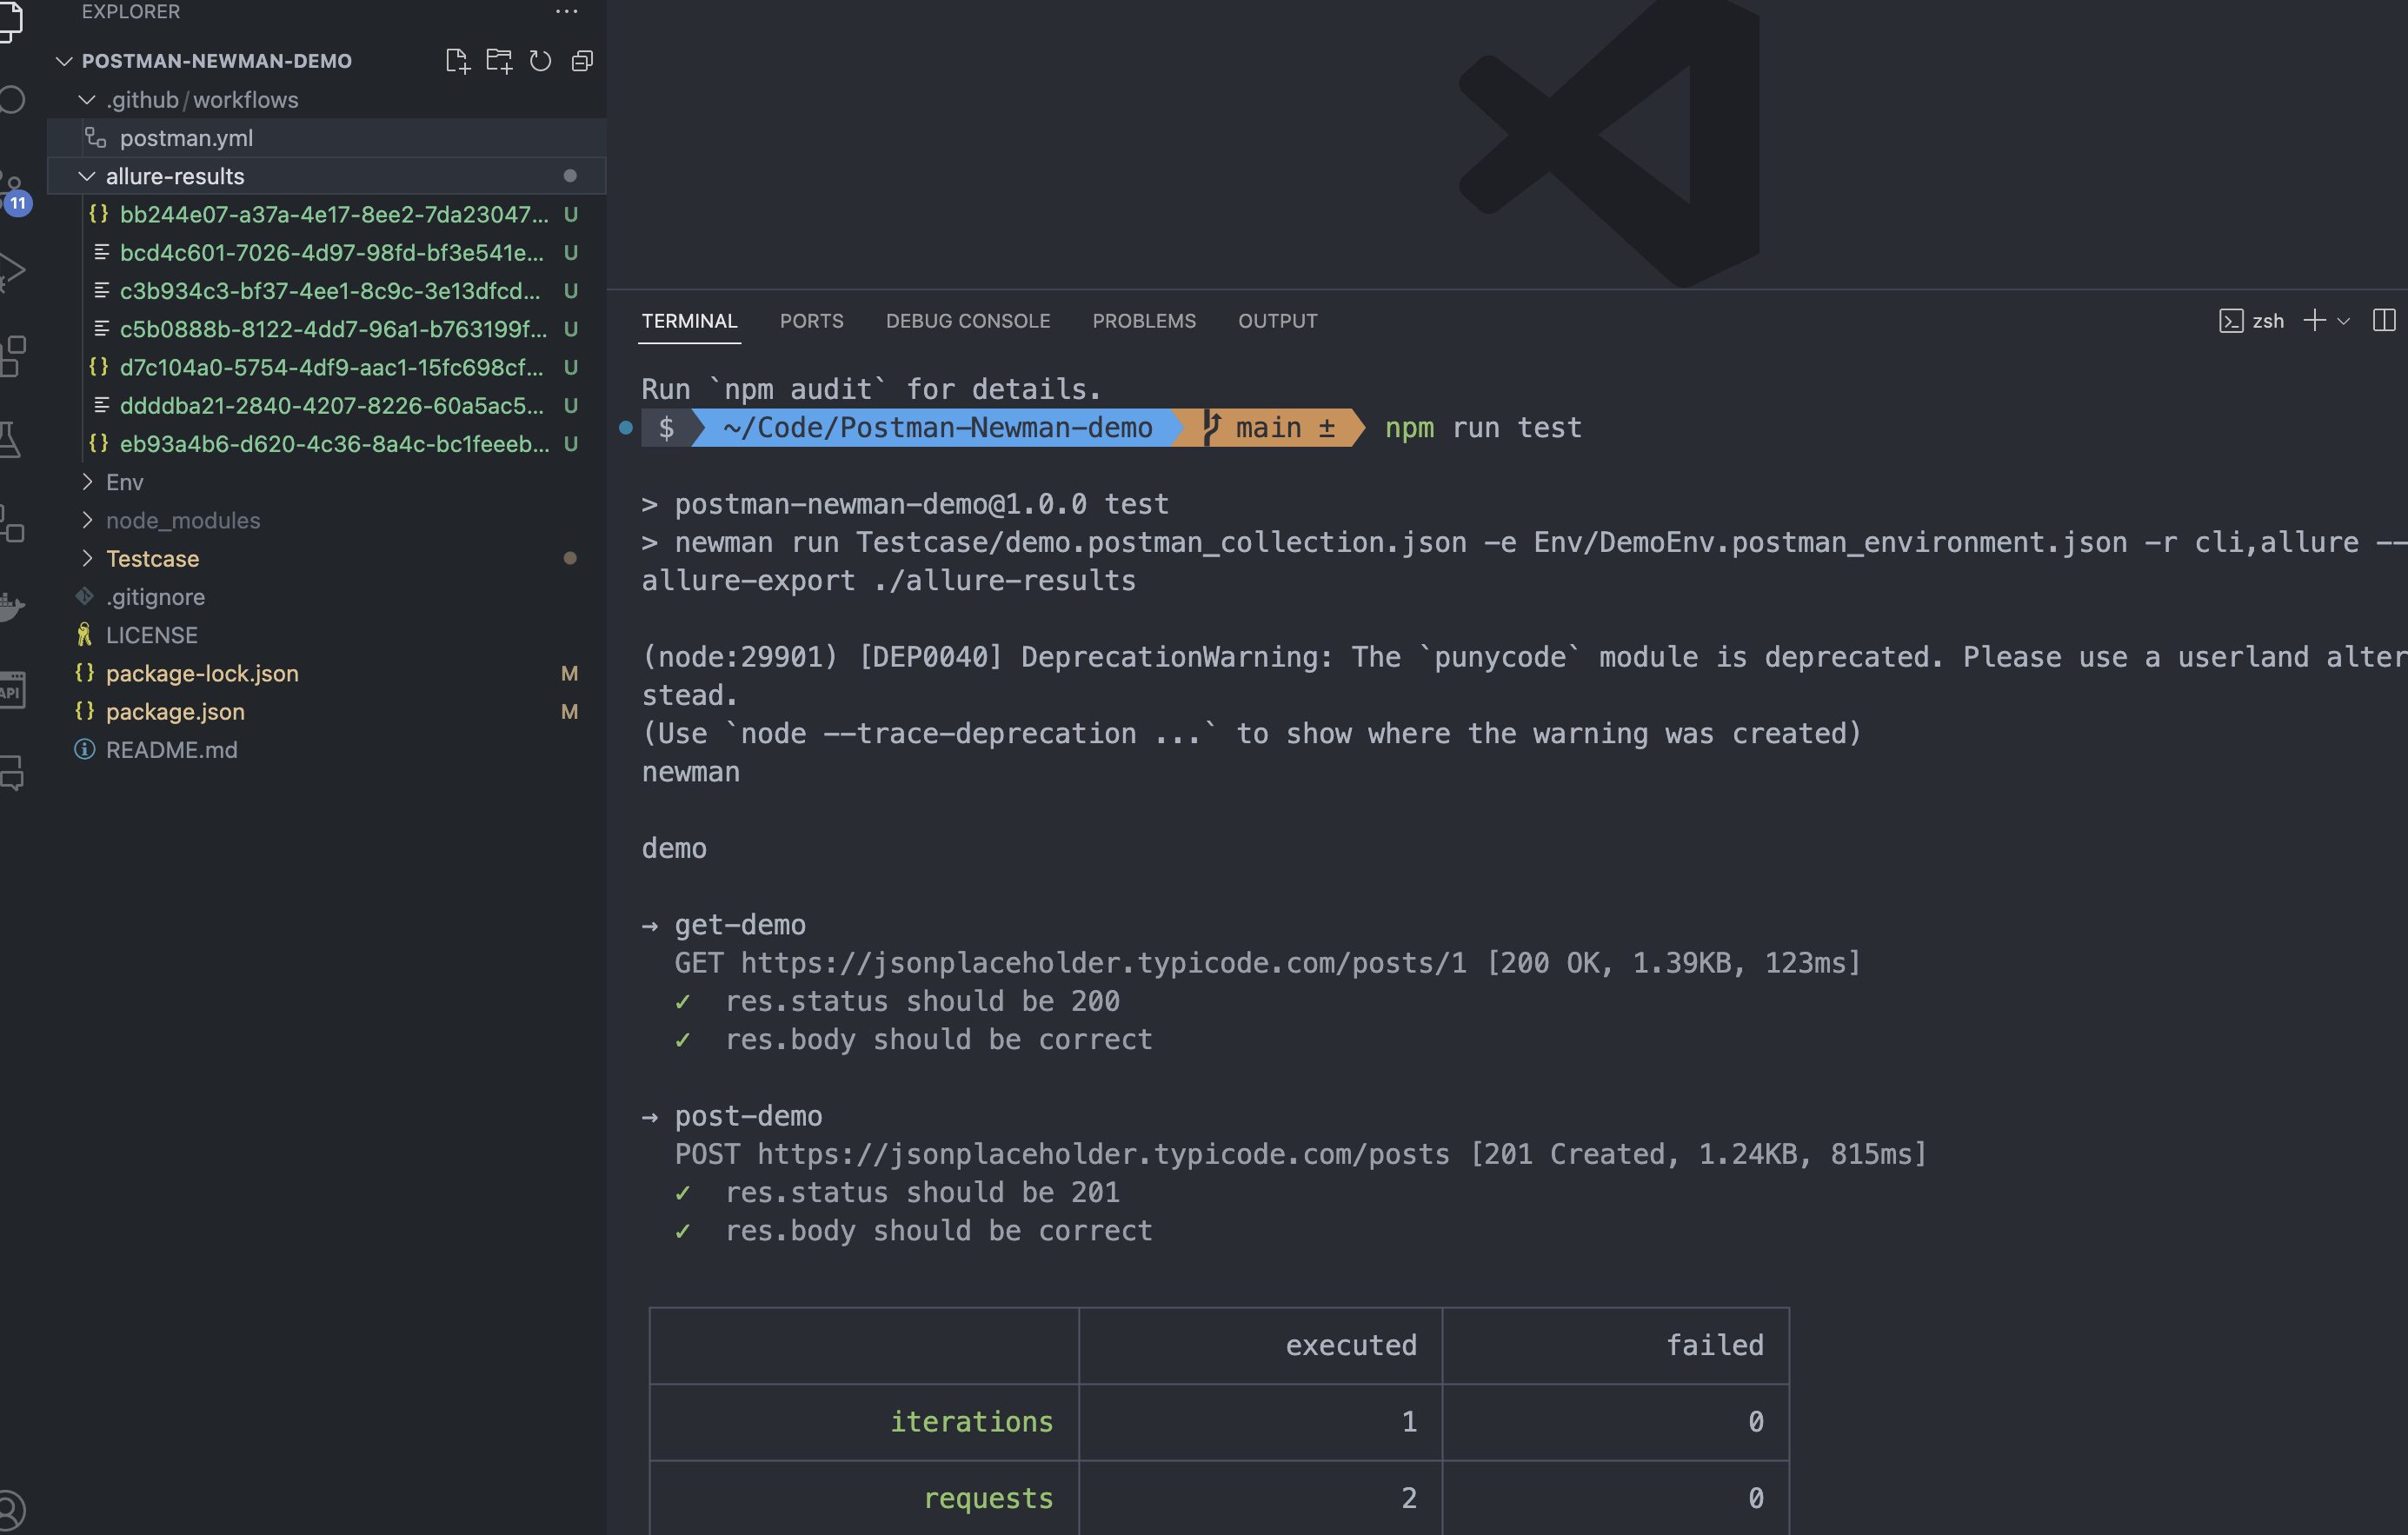
"test": "newman run Testcase/demo.postman_collection.json -e Env/DemoEnv.postman_environment.json -r cli,allure --reporter-allure-export ./allure-results"
Adjusting Postman Test Cases
- Modify the Tests script in the "get-demo" request. Add the following script to generate Allure test reports:
// @allure.label.suite=postman-new-api-testing-demo
// @allure.label.story="Verify-the-get-api-return-correct-data"
// @allure.label.owner="naodeng"
// @allure.label.tag="GETAPI"

pm.test("res.status should be 200", function () {
  pm.response.to.have.status(200);
});
pm.test("res.body should be correct", function() {
  var data = pm.response.json();
  pm.expect(data.id).to.equal(1);
  pm.expect(data.title).to.contains('provident');
});
- Adjust the Tests script in the "post-demo" request. Add the following script to generate Allure test reports:
// @allure.label.suite=postman-new-api-testing-demo
// @allure.label.story="Verify-the-post-api-return-correct-data"
// @allure.label.owner="naodeng"
// @allure.label.tag="POSTAPI"

pm.test("res.status should be 201", function () {
  pm.response.to.have.status(201);
});
pm.test("res.body should be correct", function() {
  var data = pm.response.json();
  pm.expect(data.id).to.equal(101);
  pm.expect(data.title).to.equal('foo');
});
- Save the modified Postman test cases, export the test case file again, and replace the original test case file.
Run Test Cases to Generate Allure Report
- Run the test cases
npm run test
The allure-results folder will be generated in the project folder, containing the execution results of the test cases.
- Previewing the Allure Test Report
allure serve